from sarah the sewist
So can you get a shoe contract for sewing?
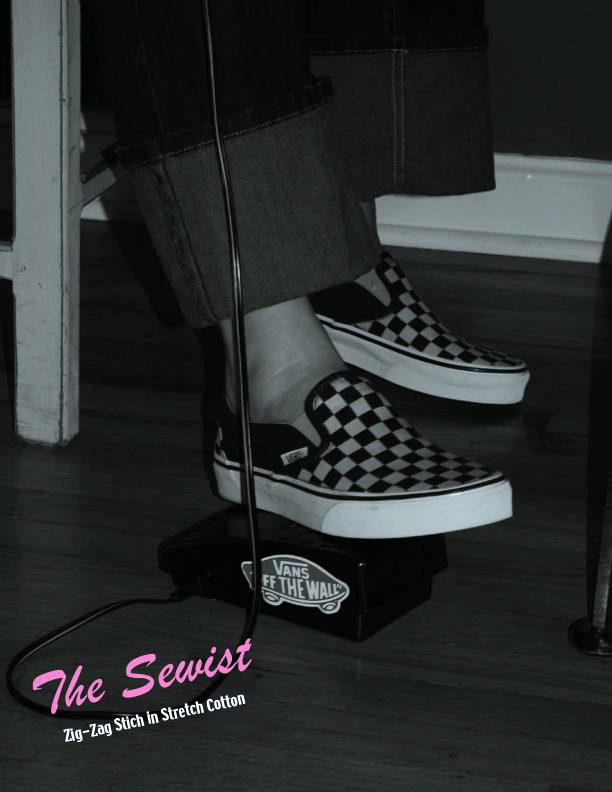
Josh saw me sewing with my brand-spankin' new shoes on (oddly, Vans seem to be the only shoes that I can wear while sewing and get enough traction for optimal foot pedal control) and stuck the sticker that was in the shoe box on the foot pedal. We have a lot of vintage skateboarding magazines around the house at the moment (believe it or not, these are related to my job---I have a very cool job) and Josh was inspired by the ads in them. They always show some cool dude doing a really cool trick in the shoes. Well, I guess I'm a cool gal doing a really cool trick with the sewing machine.
Tuesday, August 28, 2007
Shoe contract?
Sunday, August 26, 2007
Stop, Drop & Stuff
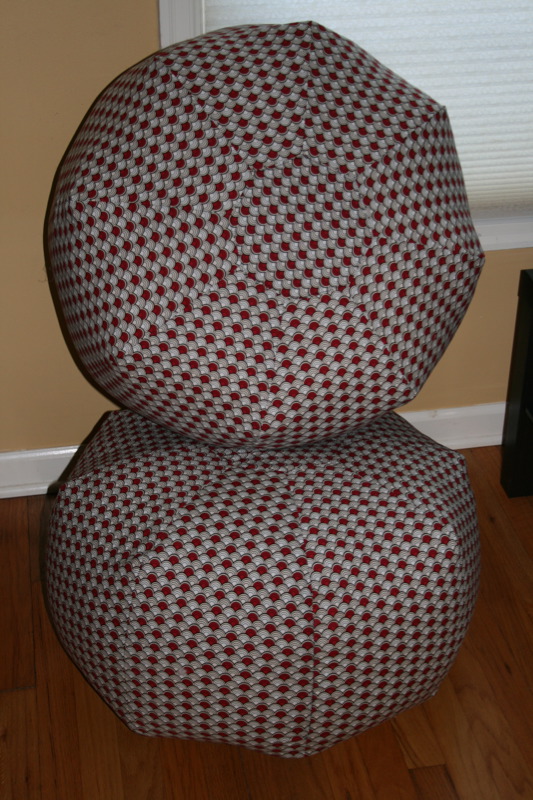
We're both sick---nothing like a late summer cold to make you feel stupid. In order to alleviate the boredom, we decided to work together and make the GIANT, Amy Butler Gum Drop Pillows. The fabric is Joel Dewberry's Manzanita Basket - Red Mix. Originally Josh wanted to use this fabric to make a shirt and then the Sewist thought of making a dress out of it (something like the Charmed Dress, but actually a dress and not half of one). Thankfully we didn't because this fabric is a little, well, busy. This looks cool as pillow, and maybe could work as some Dr. Jack Ramsay 70s style pants (if you know who Dr. Jack is, you know what we mean), but not a shirt and certainly not a dress.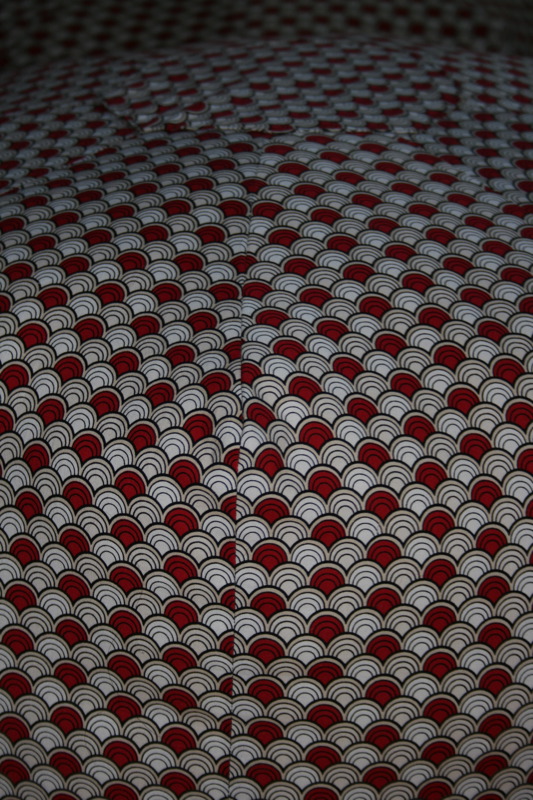
The pattern was simple and easy, like the regular gum drop pillow that the Sewist made a couple of weeks ago. These, too bad we can't curse to describe them, are BIG. The dog has decided that they are great to crash into and they are going to be great as ottomans (or perhaps a Weapon of Mass Destruction in a pillow fight).
Being sick, we looking for something uncomplicated and the sewing and construction was definitely that (well the Sewer did run out of bobbin thread, with 4 inches remaining to sew and screwed up rewinding it, which lead him to call the bobbin a favorite term from Deadwood, which almost killed---because of the coughing---the Sewist she laughed so hard).
However, finding enough stuffing was an adventure. As you well may know, the Fabric Despot is not the Sewer's favorite place. After making sure that he was dehydrated and unlikely to have to urinate, and therefore use the porta-potty/men's restroom, we headed out. We found a five pound box of Fiberfill and asked for more. After being told to go to customer service and then told to go to the wholesale desk, I exclaimed "(redacted) this" and we left. The Sewist was in need of new pillows so we went to Ikea and bought 4 for her plus two cheapos in case we needed extra. We took all of the old pillows and the two extras and cut them open and stuffed the drops. Still very short. That was Saturday night. Sunday we head downtown to Nordy's Rack and bought two Calvin Klein King Sized pillows (only 12 dollars a piece, because if you tried to sleep on them your head would fall off, trust us---they're insanely large for pillows). With the addition of these pillows and a little hand sewing they were done.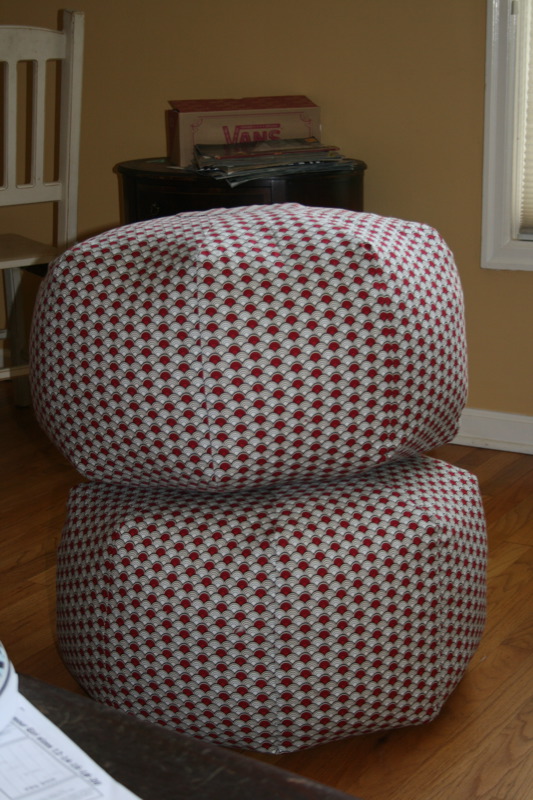
They turned out to be pretty pricey in the end (with fabric and stuffing probably 40-50 bucks a piece). No more big pillows until we can find a cheap source for lots of stuffing (my friend in the furniture biz will be hearing from me shortly). The absurd thing is, that however we crunch the numbers, it's still (we think, our number crunching is not that reliable) cheaper to buy pillows from Ikea or some other cheap place than buying Fiberfill from the Despot or anywhere else we can think of.
Ubiquitous dog being cute with the sewing project picture. PS---If you know of a cheap, or even reasonably-priced, source for Fiberfill, please let us know! We need more pillows around here!
Friday, August 24, 2007
Love it
from sarah the sewist
I finished the Hot Patterns Plain & Simple Princess Shirt this evening. I can honestly say, I have never, ever been so happy with a blouse pattern. I can really see myself making this one over and over again. I had some issues that I talked about here. But, they were really my own screwy assumptions getting in my way, and once I sorted stuff out, it really made sense and came together. Other boo-boos that were really my own fault---in the battle with the collar, I spaced turning the raw edges of the collar under and into itself; I neglected to turn the shoulder facing under; and I made it a size too big. I've had a few mishaps lately with things being too small in the, er, boob area, and so I was a little neurotic with the sizing and went up instead of down, as I was in between sizes.
Anyway, this is the three-quarter length sleeve version, and it's in an absolutely beautiful stretch cotton sateen from Robert Kaufman's "Vera" line that I got at Bolt here in Stumptown with this pattern in mind. I had second-guessed myself shortly afterward, thinking that maybe this pattern wasn't special enough for such a wonderfully smooth, elegant, and uniquely sturdy fabric. I'm glad I didn't just make another skirt or something, because the pattern and the fabric do pair very well together, creating a sort of fifties vibe. I like the shape of the neckline created by the lapel-like collar---even though I sort of screwed it up. I know I said it in my earlier post about this project, but really, if you're planning on making this shirt, please read the instructions thoroughly, check out something like Complete Guide to Sewing's (great book---I must review soon!) instructions for creating a lapel and read through and study the pictures on Off the Cuff. I've been sewing for a really long time, considering my age, and this part of the construction really proved to be challenging. It was really rewarding, though, and I felt like I learned something and added some skills to my sewing repertoire.
This shirt also made me realize that if I want to create a really nice shirt, that's more of a dressy, wear-to-work style, princess seams are the way to go. It's much easier for me to tweak for my fitting needs---which I haven't done with this shirt, but I really need to take in the waist on literally everything I make---blouses, pants, skirts. It's much easier to do with princess seams. And, while I didn't need to do this with this blouse (because I purchased "Glamour Girl" range), it's much easier to make an adjustment for my above-mentioned issues with fitting blouses. I also think, looking at these pictures, it's just a better look for me, it's more structured, and I think that looks nicer on my short self. I'm not a tall person, and I often think that a lot of professional looking clothes look funny on me, and I think the waists aren't in the right spot, etc, and it's much easier to precisely locate those critical points that make a difference in the overall structured appearance.
It's funny, I was kind of stressed out that this pattern would be a disaster, since I'd had a recent fitting?/drafting?/design?/printing? issue with an independent company's pattern (not that that there aren't major problems with patterns from the Big 4), and I really didn't want to have another frustrating end.
I plan to make more of these---who knows when, since one of the things I really love about sewing is trying new styles, techniques and fabrics, and Josh and I have quite a few projects queued up. (We need to write about that, too.)
One more picture just 'cause our dog's looking so darn cute in this shot...
Tuesday, August 21, 2007
Oh Shirt!

from josh the sewer
Last week was my week of shirts. My first project was this pictured short sleeve “chillin’ shirt” that I made using the Kwik Sew 3422, my first attempt at making a men’s shirt using a pattern, as opposed to an old cut-up shirt (which worked well enough). For the fabric I choose this Joel Dewberry “Sunburst Pattern.” I picked this up at Fabric Depot, while I was getting the sewist-in-law her cutting mat (which was deeply discounted). As an aside (which I think you can probably tell I use a lot of) this was the trip that deeply influenced my ongoing annoyance with the place. See, I drank a lot of ice tea that day and had to use the toilet very badly and to my dismay the men’s toilets were still the porta-potties out front. Now it is a fair point that there are more women there than men; and while the toilets are being renovated it is only fair that they get indoor accommodations. However, this little project has been going on for a long time and I am at a point in my life where porta-potties just don’t cut it. It was basically an uncomfortable and quick trip to the Depot.
Back to the shirt, I went with view B---the short sleeves and the collar and “stand in one.” The pattern was really well laid out and I could make sense of it myself until the collar. It came together really nicely and fits well. The seam allowances were only ¼ inch and everything else I have had made was 5/8 or ½ inch, it seemed somewhat tight---since I kept forgetting what the seam allowances were. When I do this shirt again, which I will, I am going to use the collar and stand from view A, I just think it will look better. Probably will add a bit for seam allowances, just to make for a more pleasant sewing experience. Also, I really liked that the shirt has a traditional shirt-tail in the back, and the way the placket is made. It gives the shirt a traditional, maybe even retro look.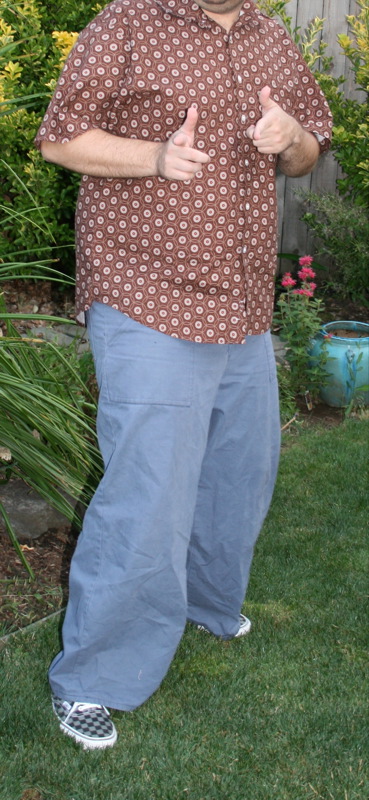
My major boo-boo was I took a chunk out of the front of the collar stand area while trying to trim some threads, I tried to cover it up with the buttonhole. Oh, yeah, and then I did the same thing somehow and had to "cover" that one up with a button. Not really sure how I managed to pull that off---twice.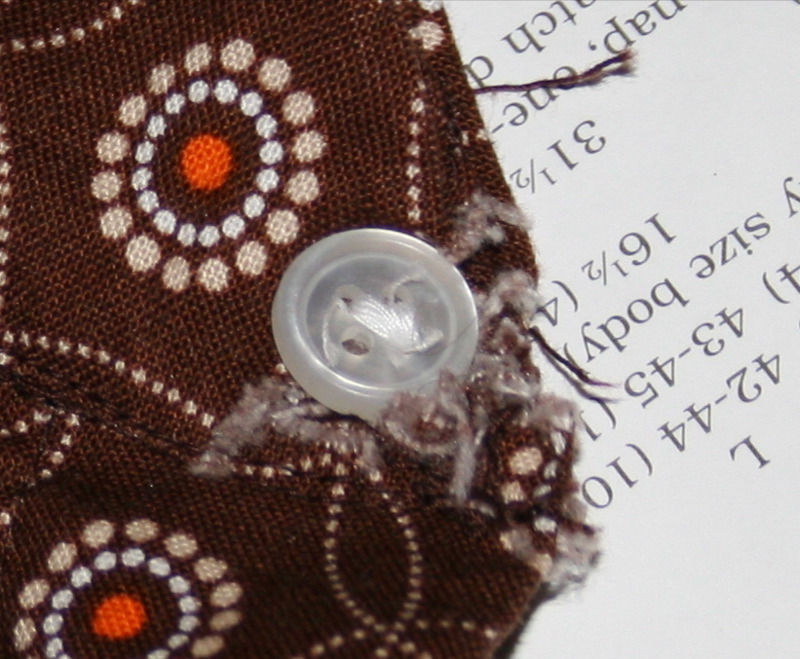
More shirts.
The other project was this week was that I took two of my ugly old dress shirts and made them into short sleeve shirts. This was easy, snip-snip, sew-sew. The first shirt was a cheap paisley number from Target. It never worked as long sleeve shirt and being out of clean shirts and not wanting to roll the sleeves, I did the surgery and the sewist hemmed it real quick like (she was working on the Princess Shirt and was sitting in front of the machine).
The second shirt is this incredibly ugly red washed silk shirt by Claiborne, for which I paid 4 dollars at Dillard’s in New Mexico. While living there, I went on this spree of buying close out clothing, trying not to spend more than 8 dollars for an article of clothing. Hell, the fact is that these shirts had buttons gave me a professional look in the City Different. It makes a great ugly beer-drinking shirt now.
Sunday, August 19, 2007
Perfect Princess?

from sarah the sewist
I'm nearing the home stretch on a shirt that may very well be an almost perfect dress shirt (for me).
About a month or so ago I sucked it up and bought three Hot Patterns patterns that I'd had my eye on---this was during their buy 2, get 1 free deal. I chose three that I thought would be very good basic wardrobe pieces: Plain & Simple Princess Shirt, Classix Nouveaux Raxor Sharp Pants and the Deco Vibe Cocoon Coat. They're each from a different one of Hot Patterns' (very cleverly-named) lines---so I could get a feeling of what their fit and design was like across a range of styles, and they're honestly quite pricey ($15-18 a pop). I'd been intrigued by their contemporary, Nordstrom-esque (Josh and I both love Nordy's waaaaay too much) designs, so I took the plunge and purchased them.
The first up was the Plain & Simple Princess Shirt. I cut into the gorgeous pink Robert Kaufman that I wrote about here. I love this fabric and it's been amazing to work with. This shirt has come together wonderfully, with the exception of a bit of a hiccup (okay, a day-long hiccup) with the collar. It's constructed like a tailored jacket lapel, rather than a regular shirt collar. I wished I'd snapped to that before I started, because that would have saved me a lot of ripping. I was saved by this post on the Off the Cuff sewing blog. If you're planning on trying this shirt, please read that oh-so-helpful post first. Trust me.
I've only got to hem the shirt and figure out the button placement. I also want to take in the waist seams a bit as well, to create a more fitted silhouette. So, hopefully, I'll be able to post the finished product in the next day or so.
Oh, and when I do post the finished product, I won't be wearing like the sketch model in the long-sleeved blouse (sorry, Josh!). Just in case you were worried.
Thursday, August 16, 2007
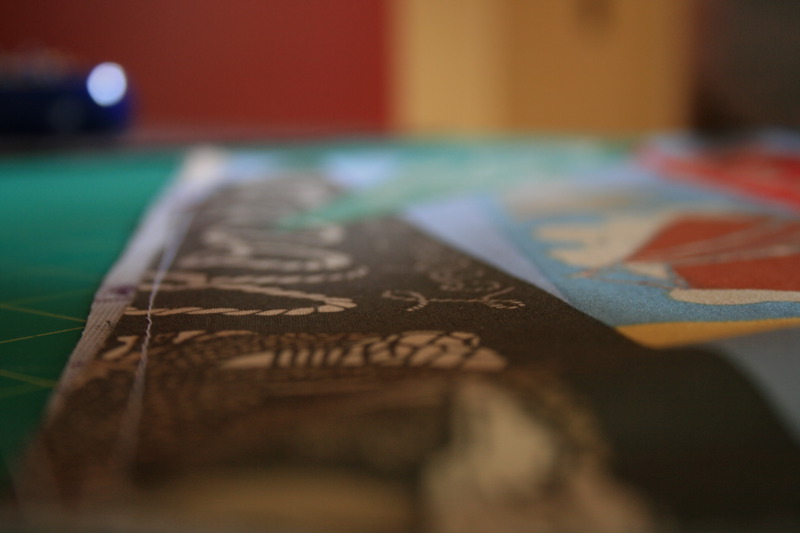
1908 Americans Fabric
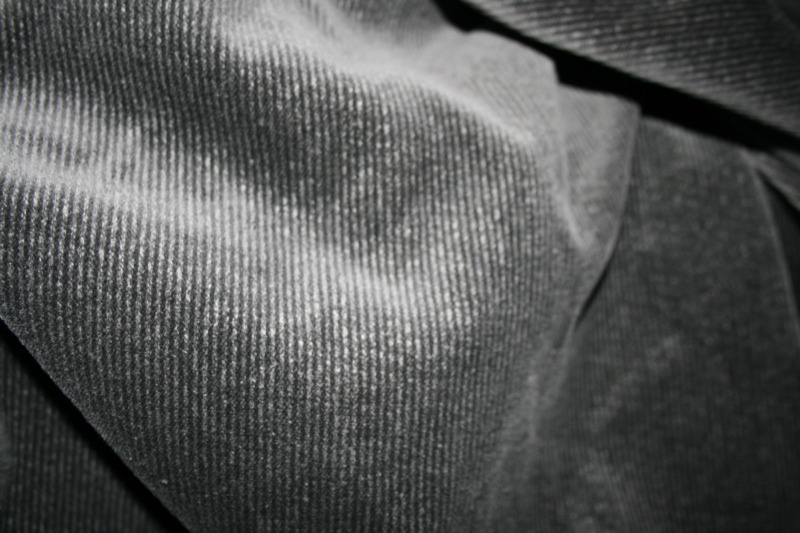 Last weekend we found the right color and drape of fabric for Josh's 1908 St. Louis Americans jacket. We considered going more authentic, but the right color, weight and drape of wool flannel is just too expensive for such an experimental project (have we mentioned that we're kind of cheap?). Instead, we found a stretch corduroy that's very fuzzy and really has the look that we want, even though it's not straight up authentic.
This is as far as we've gotten in the project.
We'll keep you posted.
A big "thank you" to Nancy of Sew West for her input on the fabric. Hopefully, this one will work out fabulously so we can do an awesome flannel one next.
Sunday, August 12, 2007
Bag: (fake) Pig (skin) in the City
from josh the sewer
I did it. I made a bag and it isn't too girly. When the Sewist and I started (well, mostly the Sewist) making her mother’s bag, I also cut out the pieces for my own bag attempt and sat it I aside until I had some time to put toward it.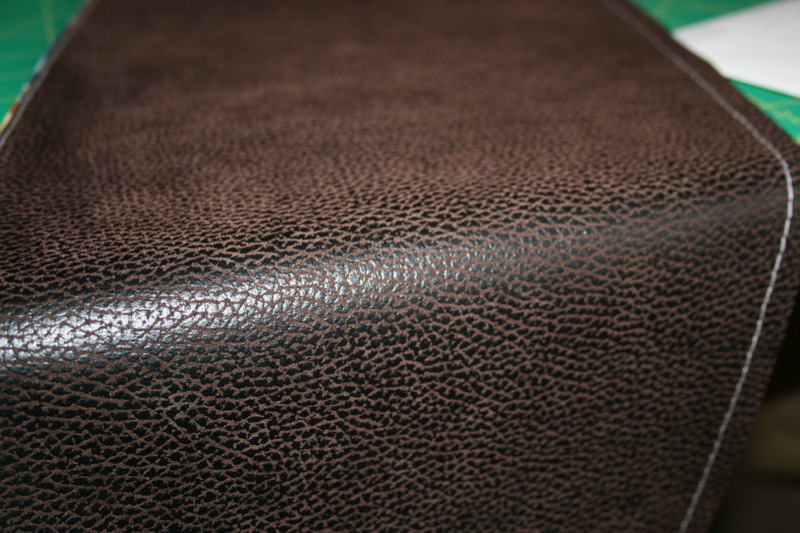
 Earlier this summer when we were looking around the Mill End Store, I noticed a bolt of pleather football upholstery and thought it would look kind of cool (almost made pants, but that would not work too well and, really, I ain’t the type for those kind of duds).
A month later I found the Moda “Varsity” fabric in the 50 percent off rack at Fabric Depot. (Already this bag is off to a weird start, I really don’t like either place that well, and don’t get me started on the Porta-Potty situation at Fabric Depot, errrrrrr. Oh, and I don’t like football that well either).
Since the football stuff is really thick, I did not use the canvas in any part of the construction except for the side panels. Like the Sewist’s bags, I left off the tab. I used white thread to contrast with the pleather and only topstitched the strap, which I also sewed a couple times to the main bag for reinforcement. I always end up carrying heavy stuff when I bother actually carrying stuff at all, so it makes sense to make it extra durable. The other change I made was to the tool pocket were I cut down on the pencil and pen holders and went with a spot to put a cell phone and a place for the iPod Nano I don’t have.
I also learned that, like everything else I sew, the seam ripper is my best friend. Which sucks. I would really like to sew something without picking something out over and over again. The strap, in particular, became intimately acquainted with my seam ripper. A word to anyone thinking about making this out of pleather: it's a tremendous pain to make the strap. If you try to iron it, it'll melt. So, first I tried basting it down, which didn't work. Then I tried gluing it, which didn't work. Finally, I glued it, then stacked books on top of the strap to hold the glued sides together, holding it in place for 24 hours. Which worked really well, until I forgot to check how much thread was left in the machine's bobbin. So, I "sewed" most of the strap without a bobbin. Back to the seam ripper (because even though there was no bobbin thread, the top stitches stuck). Finally, after try number 172, I sewed the damn thing together. And it looked pretty good.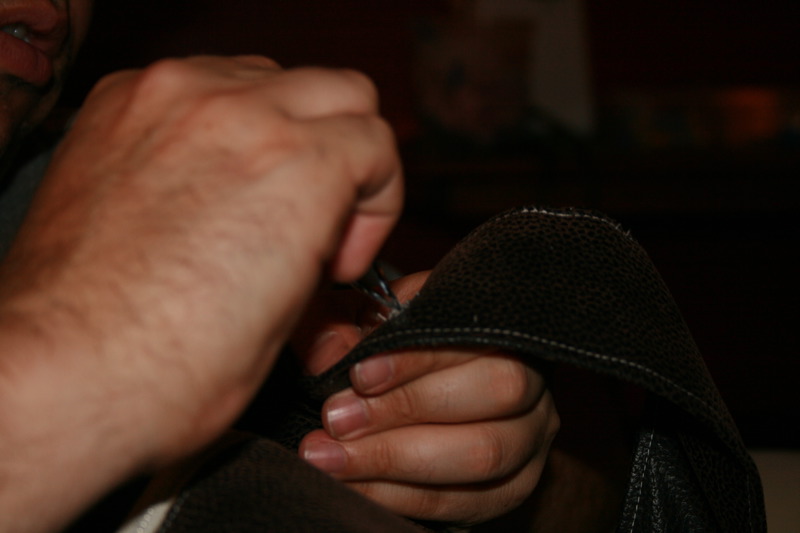
Despite all of the excitement in constructing the strap, I enjoyed putting the thing together. The pleather wasn’t that bad to work with, it rolled a little, but was manageable. Now that I am done, I am not sure I like it enough to carry around, partly because the pleather is eerily soft and I don’t actually go to that many places that I actually need to haul enough stuff to warrant carrying a bag…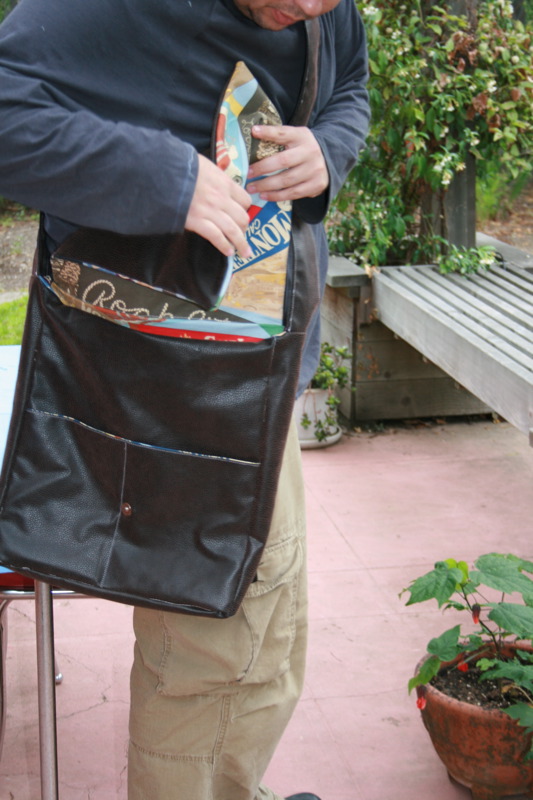
Thursday, August 9, 2007
No So Charming
from sarah the sewist
I should have quit while I was ahead.
Last weekend I picked up the Betsy Ross Patterns' "Charmed Dress" pattern. It's not really anything that unusual or special, but it seemed like a nice, classic style dress produced by an independent pattern company. I regularly read the designer/owner's blog and really like supporting the independent companies, so I'd wanted to try one of her patterns.
This should have been my first clue that this simple, straightforward dress wasn't meant to be.
If you could see my face in the photo, you would notice that I'm absolutely perplexed. The pattern pieces simply don't fit on the two yards of fabric called for in the pattern. I ended up contorting the pattern pieces, and myself, trying to make it fit (I can be a bit stubborn---just ask Josh). Finally, as the picture shows, I got the pieces to fit, but they were touching, so I was cutting it (har, har) very close. Measuring the pattern pieces and the fabric, the math simply doesn't work.
But I pushed on. Using a Michael Miller pink and brown polka dot fabric my mom picked up for me, I cut the thing out. Following the (really excellent, way better than most you see) directions, I proceeded to sew the skirt together---which went fine---and then the bodice. It was at this point something went very, very wrong. The bodice and the skirt literally couldn't physically connect to one another. The bodice stopped well above my belly-button, while the skirt ended where it's supposed to---at the natural waist. It simply wasn't going to happen. Now, I am not a tall person, so this cannot be explained away by an oddly long torso or something. I would post a picture, but that would be scary for the readers and mortifying for me. There were several other issues (that were resolvable), such as the dart needing to be moved somewhat, but I just can't get over this one. It's definitely a first---usually I'm able to at least get to the point where I can sew two major parts of a garment together.
Anyway... What to do? What to do? It seems like this is an entirely fixable problem. I really just need to make a new bodice that's much, much longer. I could just make a skirt out of the bottom half and call it a day.
Either way, I am very disappointed, as I really like the classic styles offered by the company, and like that there's a real person behind the business. I almost wonder if I got a defective pattern. I noticed on the web site that the size range I bought isn't even offered anymore, so I do wonder if there have been others with the same problem, and it's a design flaw? I'm also really annoyed with myself, because there were many, many points at which I knew that there was something wrong with this pattern, that it wasn't going to work, but I continued working on it. I really should have listened to my instincts. I have enough "sewing sense" that I'm usually right about these things.
All, in all, here's what I think of the Betsy Ross "Charmed Dress"
The Good: The directions are formatted in a little booklet, which is much easier to deal with than an big ol' sheet that I can't ever fold back correctly; the tone is very friendly, but not annoyingly so; I also like the black pattern envelope (weird, I know); the style is classic.
The Bad: The pattern doesn't adjust fabric quantities for various sizes, which is annoying and just plain inaccurate. The dart placement is a bit low, and a little more straight on, if that makes sense. I prefer a more diagonal style. There aren't finished garment measurements or ease amounts included, which I find annoying, but that's a common gripe I have with any number of patterns.
The Ugly: Uh, the fact that the pieces simply don't connect? That's really ugly.
I'll keep you posted if I decide to re-draft the bodice.
Tuesday, August 7, 2007
A First
 This post has moved to our new blog. The direct link is located here.
from sarah the sewist
Since Josh is working on a pretty complicated, involved project at the moment (more on that when he's done), I decided to start (and finish) a simple project... You know, to create some balance in the sewer-sewist sewing world. During the Fabric Depot 30% off sale (which seems to have been running perpetually lately), I picked up the Amy Butler pattern for the Gum Drop Pillows. These things are basically HUGE octagonal puffs.
Oddly, this is the first home decorator item I've made in twenty-odd years of sewing. I've racked my brain and I don't think that I've ever made a curtain, pillowcase, pot holder and certainly not a quilt. It just never occurred to me. I learned to sew clothes years ago, and that's what I've stuck with. But, Josh and I have been complaining about our profound lack of "stuff" in our house, and I saw this pattern, and figured it'd be pretty simple and low commitment.
I used some lovely, typically fun Free Spirit 100% cotton poplin from Heather Ross' "Lightning Bugs" collection. I sewed the smaller puff, with alternating yellow and brown panels, with white in the same fabric as the top panel. The instructions have you cut out what is half the pattern pieces, trace them and then flip the piece over and trace the other side. That was way too fussy for me, so I just cut out each side with my rotary cutter, flipping the piece over to make the whole panel. 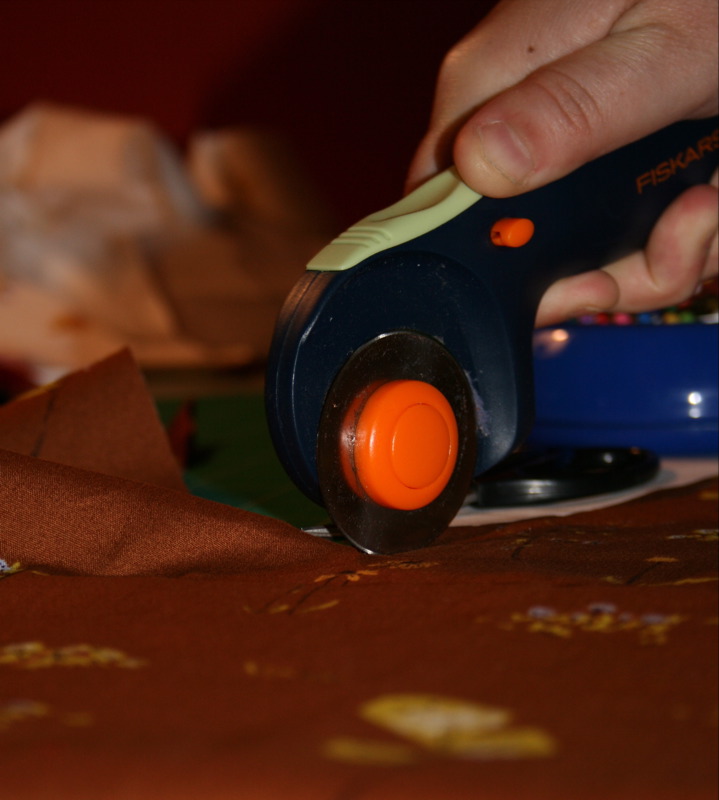

Then I just sewed the entire thing together. It was that easy. That part took literally less than an hour.
Then the real fun began...
Since I'm sort of cheap (both of us are, actually), I really didn't want to spent $20+ on stuffing. We have quite a few old pillows laying around the house, so I simply de-stuffed a couple and used that filling to stuff the new puff. Our dog took quite the interest in this part of the process (maybe sewing can really be a family affair?) and decided to "help" by sitting right next to me, staring as I de-stuffed and re-stuffed. I think it blew her mind---it was just too much like her de-stuffing her toys. (She may have been thinking, "Mom's really a DOG?!") All-in-all, it took one and a half old king-sized pillows to stuff the puff. I'm not sure if that's equivalent to the recommended 10-twelve ounce bags of filling called for in the pattern.
Finally, because I really couldn't think of a way to strong-arm the puff (it's really BIG) into the sewing machine to close the hole left for stuff, I was forced to hand sew. I hate hand sewing, and truly cannot remember the last time I hand sewed anything. Despite that it took me forever, the finished product turned out pretty great... Except one little thing... Can you spot it?
 Yeah, I forgot this was a directional fabric. For about five seconds I considered re-doing the entire thing. Then I realized that would be insane. So it is, how it is.
I actually really like this puff, and I think I'll make the larger version soon, so we can have an ottomans. They're that big.
Oh, and the dog loves it.
Monday, August 6, 2007
New Fabric
 from sarah the sewist
One pink, one brown. Both Robert Kaufman stretch "Vera" sateen. Had a plan for these, but reconsidering said plan. For some reason pants and a shirt just don't seem interesting enough. Lots of projects to go before I have to commit either of these to a pattern.
Both were procured this weekend at Bolt. They also had red. The red was pretty awesome.
Dude, Here's My Pants
from josh the sewer
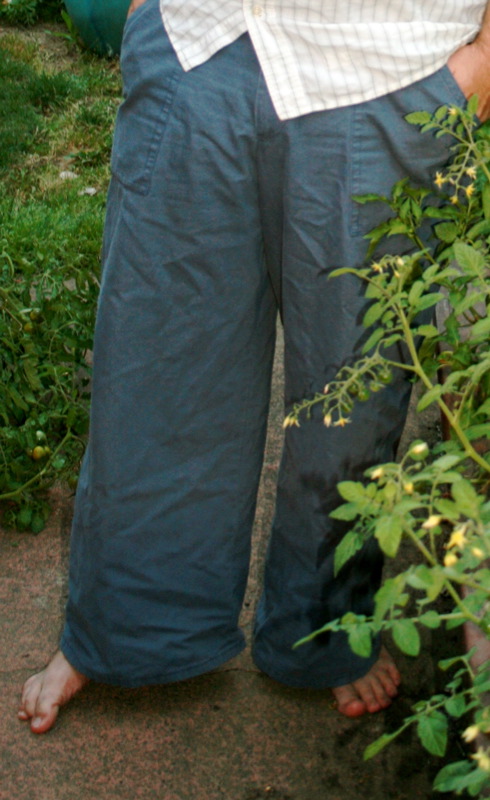 My first attempt at making pants is Simplicity 3891. As you can see, I decided that all of the accouterments were kind of goofy, plus I already own a pair of Costco cargo pants and I really need pants with fewer pockets. I went with a blue canvas from Bolt and blue thread; if I had the skills it woulda been orange thread….
Anyway the fit is great, except I hemmed them a little higher than I like, which is completely my fault. I really need to accept the fact that I like ground draggers when it comes to these sorts of things. I also ripped off the back pocket flaps, which I deemed stupid after putting them on. With the thick canvas and interfacing I think it would have felt like sitting on two coasters. It’s sort of too bad because the top stitching looked good---top stitching around corners is a huge pain. Next time I plan to make some sweet top-stitching with the twin needle to add some flair.
The directions were fairly basic; the better (sewing) half walked me through it, until we got to the bit about putting one leg through the other to do the crotch—still baffled how we pulled that one off, to be honest.
Below you can see where I really screwed up. I trimmed the seams too damn close, which meant after a week of wearing, sunlight was getting through. This is an ongoing problem of mine (trimming seams too close, not holes in the backside of my pants), which necessitated re-sewing a knit shirt twice recently. I have never been great with scissors anyway and somehow I have become obsessive with making sure everything is tidy, even if it means trimming the seams closer and closer until they’re completely even. I am not a tidy person, which means I find a way to make tidy messy (follow the logic… I am losing myself).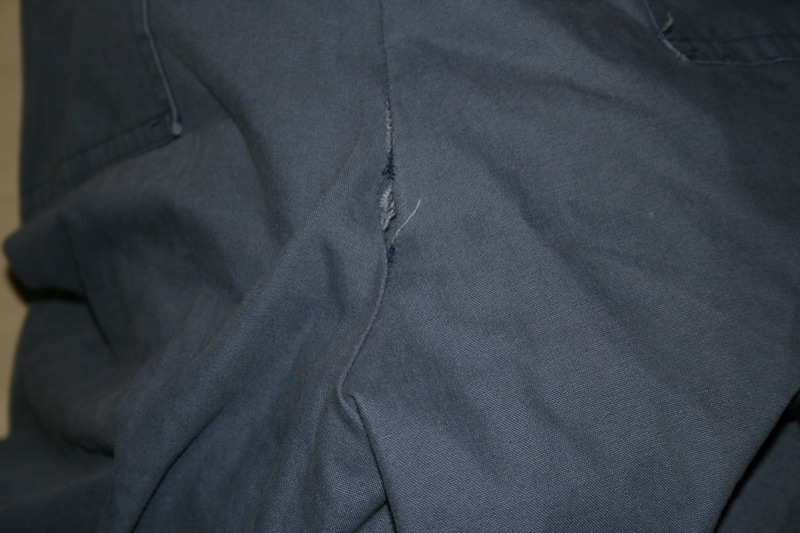
Next pair I am hoping to construct in tan rip-stop and orange top-stitching, and I think I am going to take the legs in a little under the knee, so they’re more straight, less of an A-line. This pair runs a little too close to Estonian Navy for my taste (of course I wear them all of the time, who cares—they are comfortable as hell). The girl thinks the look great though. I think she is just happy they don’t have so many unusable pockets. She’s also happy that they fit appropriately rather than being two sizes too large, like most of my other pants. I should also mention that I carry very little with me at all times, which makes cargo pants even stupider for me.
By the way, I never go barefoot. It's weird I'm not wearing shoes in these photos.
Saturday, August 4, 2007
Two Buck Skirt
 from sarah the sewist
Saturday morning I finished (after having started Friday night) what I call my "Organic Yoga Skirt," but what Josh calls "Two-Buck (Not Chuck) Skirt." Which is, of course, way funnier than anything I could name an article of clothing.
The fabric is from our Sport Fabric Haul at Rose City Textiles, the smoky blue organic cotton knit that's identical to my favorite JJill sweatshirt. It only took about a yard and a quarter to make this skirt---so I'm thinking I'm going to have a lot of smoky blue in my wardrobe. We have a lot of this stuff. I whipped up #126 from the July 2007 issue of Burda World of Fashion. Apparently, the German gal in the magazine was having the same problem with her skirt that I was, as her skirt is bunching in the same weird manner as mine. It looks great, though, and I think that the bunching has more to do with the way she and I are both standing than any design or sewing flaw. The wrinkles are not a design element. 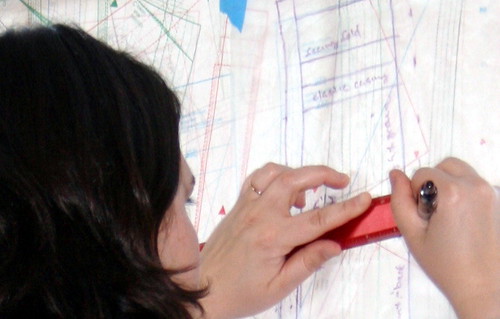 This being Burda World of Fashion, I had to trace the pattern off of the magazine insert. I read somewhere a great tip for doing tis using wax paper, and it really worked great. All of the intersecting lines and jumbled up pattern markings were much clearer when I taped normal kitchen wax paper to the pattern sheet and taped the whole thing to our living room window. If you need more width, you can fuse the paper together with an iron. In a weird way, tracing the pattern was kind of the most fun part of the whole project. That and using the twin needle. That was awesome.
Edited to add: I've had a couple questions about what the process is in tracing the pattern. Here are the steps:
- Supplies needed: Roll of wax paper, blue painter's tape, sharpie.
- Take your Burda sheet and iron it like a normal pattern.
- Tape it to your window, so to create a natural light box for tracing. I have a really big living room window, so that makes it pretty easy.
- Fuse together enough lengths of wax paper to cover each of the pattern pieces you're using from the magazine. (You can fuse the wax paper by putting your iron on the low setting and gently tapping it on the wax paper. A smart person would place a dish towel or something between the iron and the wax paper. I like to live on the edge, so I don't.)
- Tape the wax paper to the Burda pattern sheet.
- Trace the lines of the pattern onto the wax paper using the sharpie. It would probably make your life easier if you used a sharpie in the same color as the pattern lines. I think I'll do that next time.
- Don't forget to trace dart lines, and other markings, too.
- Don't forget to add your seam and hem allowances. Burda gives suggestions for both in their pattern "instructions.
- Untape everything from the wall and cut your pattern out.
Thursday, August 2, 2007
Inspiration
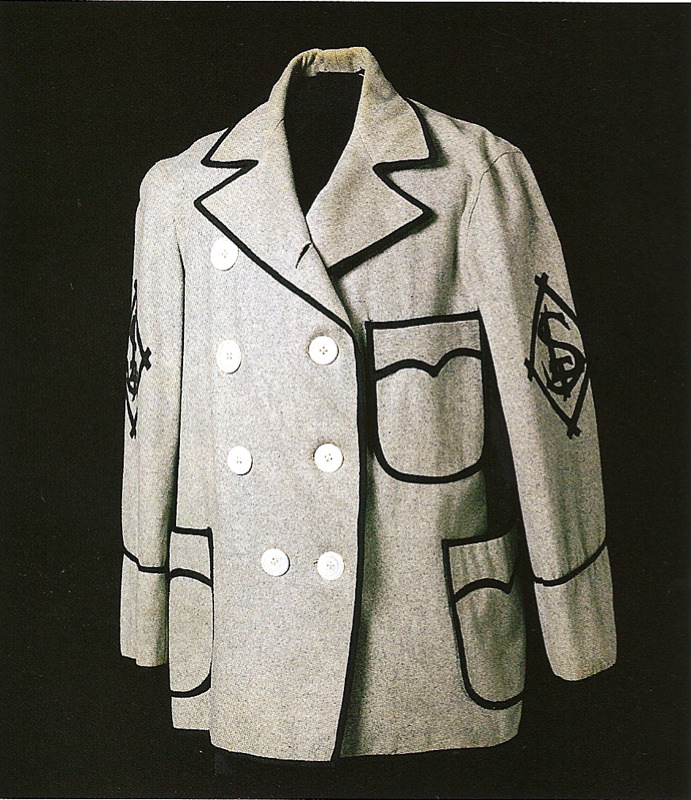 What you have here is a 1908 St. Louis Americans Warm Up Jacket. That's baseball. We're looking at trying to replicate this as our big fall project. We're perplexed about the fabric choice, though. What do you think? Corduroy? Flannel? Boiled wool? Nothing seems just right, and all we've got to go on is a photo in an auction catalog Josh picked up at Powell's. The plan we're thinking about right now is to go for a gray corduroy (because it's relatively cheap) for the first one, pretty much copying the styling as much as we can---with the exception of the wacky button placement. Then, if that works out, maybe Josh will go for a Cincinnati Reds-inspired version in red wool.
It'll also give Josh a chance to mess around with his favorite sewing technique---appliqué. No, we're not kidding. Josh loves appliqués.
Subscribe to:
Posts (Atom)
